Part Finder - Yamaha Motor Aus - 2012 - VX1100B- (VX1100 DELUXE (WV)) - GRAPHICS
Please note: that parts quantities shown on parts diagrams are the quantity of that part that exists on the bike, Not the quantity that we
have in stock. Please click on the parts individually to check stock availability, thank you.
Please note: that pricing shown is individual/single per item pricing only unless otherwise indicated in part description.
Ref
Part Number
Description
Part/Desc
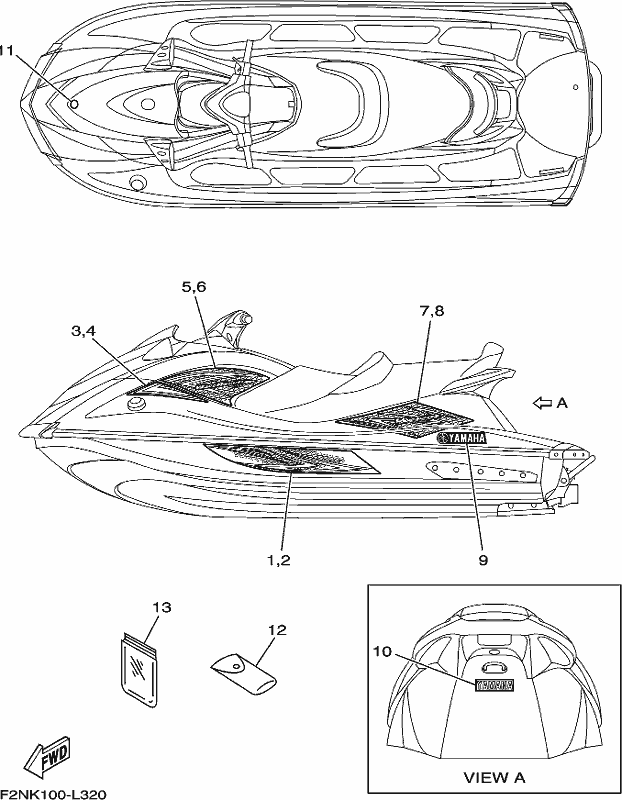
3
F2N-U417D-90
DF GRAPHIC 3 (LH)
F2N-U417D-90DF GRAPHIC 3 (LH)
3
F2N-U417D-A0
DF GRAPHIC 3 (LH)
F2N-U417D-A0DF GRAPHIC 3 (LH)
3
F2N-U417D-B0
#N GRAPHIC 3 (LH)
F2N-U417D-B0#N GRAPHIC 3 (LH)
3
F2N-U417D-C0
DF GRAPHIC 3 (LH)
F2N-U417D-C0DF GRAPHIC 3 (LH)
Ref
Part Number
Description
Part/Desc
4
F2N-U417E-90
DF GRAPHIC 4 (RH)
F2N-U417E-90DF GRAPHIC 4 (RH)
4
F2N-U417E-A0
#N GRAPHIC 4 (RH)
F2N-U417E-A0#N GRAPHIC 4 (RH)
4
F2N-U417E-B0
DF GRAPHIC 4 (RH)
F2N-U417E-B0DF GRAPHIC 4 (RH)
4
F2N-U417E-C0
DF GRAPHIC 4 (RH)
F2N-U417E-C0DF GRAPHIC 4 (RH)
Ref
Part Number
Description
Part/Desc
5
F2N-U417F-90
DG GRAPHIC 5 (LH)
F2N-U417F-90DG GRAPHIC 5 (LH)
5
F2N-U417F-A0
DG GRAPHIC 5 (LH)
F2N-U417F-A0DG GRAPHIC 5 (LH)
5
F2N-U417F-B0
DG GRAPHIC 5 (LH)
F2N-U417F-B0DG GRAPHIC 5 (LH)
5
F2N-U417F-C0
DG GRAPHIC 5 (LH)
F2N-U417F-C0DG GRAPHIC 5 (LH)
Ref
Part Number
Description
Part/Desc
6
F2N-U417G-90
DG GRAPHIC 6 (RH)
F2N-U417G-90DG GRAPHIC 6 (RH)
6
F2N-U417G-A0
DG GRAPHIC 6 (RH)
F2N-U417G-A0DG GRAPHIC 6 (RH)
6
F2N-U417G-B0
DG GRAPHIC 6 (RH)
F2N-U417G-B0DG GRAPHIC 6 (RH)
6
F2N-U417G-C0
DG GRAPHIC 6 (RH)
F2N-U417G-C0DG GRAPHIC 6 (RH)
Ref
Part Number
Description
Part/Desc
1
F2N-U417B-90
DG GRAPHIC 1 (LH) CRUISER BLUE
F2N-U417B-90DG GRAPHIC 1 (LH) CRUISER BLUE
1
F2N-U417B-A0
DG GRAPHIC 1 (LH) CRUISER GRAY
F2N-U417B-A0DG GRAPHIC 1 (LH) CRUISER GRAY
1
F2N-U417B-B0
#N GRAPHIC 1 (LH)
F2N-U417B-B0#N GRAPHIC 1 (LH)
1
F2N-U417B-C0
DG GRAPHIC 1 (LH)
F2N-U417B-C0DG GRAPHIC 1 (LH)
Ref
Part Number
Description
Part/Desc
2
F2N-U417C-90
DG GRAPHIC 2 (RH)
F2N-U417C-90DG GRAPHIC 2 (RH)
2
F2N-U417C-A0
DG GRAPHIC 2 (RH)
F2N-U417C-A0DG GRAPHIC 2 (RH)
2
F2N-U417C-B0
DG GRAPHIC 2 (RH)
F2N-U417C-B0DG GRAPHIC 2 (RH)
2
F2N-U417C-C0
DG GRAPHIC 2 (RH)
F2N-U417C-C0DG GRAPHIC 2 (RH)
Ref
Part Number
Description
Part/Desc
10
F1W-U4114-20
#N MARK, YAMAHA A
F1W-U4114-20#N MARK, YAMAHA A
10
F1X-U4114-60
DF MARK, YAMAHA A LGM3
F1X-U4114-60DF MARK, YAMAHA A LGM3
10
F1X-U4114-50
DF MARK, "YAMAHA" FOR DPBMT
F1X-U4114-50DF MARK, "YAMAHA" FOR DPBMT
10
F1W-U4114-00
#N MARK, YAMAHA A RED
F1W-U4114-00#N MARK, YAMAHA A RED
Ref
Part Number
Description
Part/Desc
7
F2N-U417H-90
DG GRAPHIC 7 (LH)
F2N-U417H-90DG GRAPHIC 7 (LH)
7
F2N-U417H-A0
DG GRAPHIC 7 (LH)
F2N-U417H-A0DG GRAPHIC 7 (LH)
7
F2N-U417H-B0
DG GRAPHIC 7 (LH)
F2N-U417H-B0DG GRAPHIC 7 (LH)
7
F2N-U417H-C0
DG GRAPHIC 7 (LH)
F2N-U417H-C0DG GRAPHIC 7 (LH)
Ref
Part Number
Description
Part/Desc
8
F2N-U417J-90
DG GRAPHIC 8 (RH)
F2N-U417J-90DG GRAPHIC 8 (RH)
8
F2N-U417J-A0
DG GRAPHIC 8 (RH)
F2N-U417J-A0DG GRAPHIC 8 (RH)
8
F2N-U417J-B0
DG GRAPHIC 8 (RH)
F2N-U417J-B0DG GRAPHIC 8 (RH)
8
F2N-U417J-C0
DG GRAPHIC 8 (RH)
F2N-U417J-C0DG GRAPHIC 8 (RH)
Ref
Part Number
Description
Part/Desc
9
F1W-U411C-20
#W EMBLEM YAMAHA BLUE BACKGROUND
F1W-U411C-20#W EMBLEM YAMAHA BLUE BACKGROUND
9
F1X-U411C-60
DG EMBLEM, YAMAHA LGM3
F1X-U411C-60DG EMBLEM, YAMAHA LGM3
9
F1X-U411C-50
#S EMBLEM "YAMAHA" FOR DPBMT
F1X-U411C-50#S EMBLEM "YAMAHA" FOR DPBMT
9
F1W-U411C-00
#W EMBLEM, YAMAHA RED BACKGROUND
F1W-U411C-00#W EMBLEM, YAMAHA RED BACKGROUND
Ref
Part Number
Description
Part, Description
# On Img
# Cart
$ Each
Notes
1
F2N-U417B-90
DG GRAPHIC 1 (LH) CRUISER BLUE
F2N-U417B-90DG GRAPHIC 1 (LH) CRUISER BLUE1 on diagram
x1
24.64
1
F2N-U417B-A0
DG GRAPHIC 1 (LH) CRUISER GRAY
F2N-U417B-A0DG GRAPHIC 1 (LH) CRUISER GRAY1 on diagram
x1
26.26
1
F2N-U417B-B0
#N GRAPHIC 1 (LH)
F2N-U417B-B0#N GRAPHIC 1 (LH)1 on diagram
x1
39.96
1
F2N-U417B-C0
DG GRAPHIC 1 (LH)
F2N-U417B-C0DG GRAPHIC 1 (LH)1 on diagram
x1
28.22
2
F2N-U417C-90
DG GRAPHIC 2 (RH)
F2N-U417C-90DG GRAPHIC 2 (RH)1 on diagram
x1
24.64
2
F2N-U417C-A0
DG GRAPHIC 2 (RH)
F2N-U417C-A0DG GRAPHIC 2 (RH)1 on diagram
x1
26.26
2
F2N-U417C-B0
DG GRAPHIC 2 (RH)
F2N-U417C-B0DG GRAPHIC 2 (RH)1 on diagram
x1
28.22
2
F2N-U417C-C0
DG GRAPHIC 2 (RH)
F2N-U417C-C0DG GRAPHIC 2 (RH)1 on diagram
x1
28.22
3
F2N-U417D-90
DF GRAPHIC 3 (LH)
F2N-U417D-90DF GRAPHIC 3 (LH)1 on diagram
x1
13.50
3
F2N-U417D-A0
DF GRAPHIC 3 (LH)
F2N-U417D-A0DF GRAPHIC 3 (LH)1 on diagram
x1
14.20
3
F2N-U417D-B0
#N GRAPHIC 3 (LH)
F2N-U417D-B0#N GRAPHIC 3 (LH)1 on diagram
x1
17.25
3
F2N-U417D-C0
DF GRAPHIC 3 (LH)
F2N-U417D-C0DF GRAPHIC 3 (LH)1 on diagram
x1
17.25
4
F2N-U417E-90
DF GRAPHIC 4 (RH)
F2N-U417E-90DF GRAPHIC 4 (RH)1 on diagram
x1
13.43
4
F2N-U417E-A0
#N GRAPHIC 4 (RH)
F2N-U417E-A0#N GRAPHIC 4 (RH)1 on diagram
x1
14.20
4
F2N-U417E-B0
DF GRAPHIC 4 (RH)
F2N-U417E-B0DF GRAPHIC 4 (RH)1 on diagram
x1
17.25
4
F2N-U417E-C0
DF GRAPHIC 4 (RH)
F2N-U417E-C0DF GRAPHIC 4 (RH)1 on diagram
x1
17.25
5
F2N-U417F-90
DG GRAPHIC 5 (LH)
F2N-U417F-90DG GRAPHIC 5 (LH)1 on diagram
x1
24.50
5
F2N-U417F-A0
DG GRAPHIC 5 (LH)
F2N-U417F-A0DG GRAPHIC 5 (LH)1 on diagram
x1
26.00
5
F2N-U417F-B0
DG GRAPHIC 5 (LH)
F2N-U417F-B0DG GRAPHIC 5 (LH)1 on diagram
x1
27.15
5
F2N-U417F-C0
DG GRAPHIC 5 (LH)
F2N-U417F-C0DG GRAPHIC 5 (LH)1 on diagram
x1
27.15
6
F2N-U417G-90
DG GRAPHIC 6 (RH)
F2N-U417G-90DG GRAPHIC 6 (RH)1 on diagram
x1
24.50
6
F2N-U417G-A0
DG GRAPHIC 6 (RH)
F2N-U417G-A0DG GRAPHIC 6 (RH)1 on diagram
x1
26.00
6
F2N-U417G-B0
DG GRAPHIC 6 (RH)
F2N-U417G-B0DG GRAPHIC 6 (RH)1 on diagram
x1
27.15
6
F2N-U417G-C0
DG GRAPHIC 6 (RH)
F2N-U417G-C0DG GRAPHIC 6 (RH)1 on diagram
x1
27.15
7
F2N-U417H-90
DG GRAPHIC 7 (LH)
F2N-U417H-90DG GRAPHIC 7 (LH)1 on diagram
x1
28.56
7
F2N-U417H-A0
DG GRAPHIC 7 (LH)
F2N-U417H-A0DG GRAPHIC 7 (LH)1 on diagram
x1
30.36
7
F2N-U417H-B0
DG GRAPHIC 7 (LH)
F2N-U417H-B0DG GRAPHIC 7 (LH)1 on diagram
x1
25.89
7
F2N-U417H-C0
DG GRAPHIC 7 (LH)
F2N-U417H-C0DG GRAPHIC 7 (LH)1 on diagram
x1
25.89
8
F2N-U417J-90
DG GRAPHIC 8 (RH)
F2N-U417J-90DG GRAPHIC 8 (RH)1 on diagram
x1
28.56
8
F2N-U417J-A0
DG GRAPHIC 8 (RH)
F2N-U417J-A0DG GRAPHIC 8 (RH)1 on diagram
x1
30.36
8
F2N-U417J-B0
DG GRAPHIC 8 (RH)
F2N-U417J-B0DG GRAPHIC 8 (RH)1 on diagram
x1
25.89
8
F2N-U417J-C0
DG GRAPHIC 8 (RH)
F2N-U417J-C0DG GRAPHIC 8 (RH)1 on diagram
x1
25.89
9
F1W-U411C-20
#W EMBLEM YAMAHA BLUE BACKGROUND
F1W-U411C-20#W EMBLEM YAMAHA BLUE BACKGROUND2 on diagram
x2
76.71
9
F1X-U411C-60
DG EMBLEM, YAMAHA LGM3
F1X-U411C-60DG EMBLEM, YAMAHA LGM32 on diagram
x2
26.80
9
F1X-U411C-50
#S EMBLEM "YAMAHA" FOR DPBMT
F1X-U411C-50#S EMBLEM "YAMAHA" FOR DPBMT2 on diagram
x2
86.08
9
F1W-U411C-00
#W EMBLEM, YAMAHA RED BACKGROUND
F1W-U411C-00#W EMBLEM, YAMAHA RED BACKGROUND2 on diagram
x2
49.85
10
F1W-U4114-20
#N MARK, YAMAHA A
F1W-U4114-20#N MARK, YAMAHA A1 on diagram
x1
12.54
10
F1X-U4114-60
DF MARK, YAMAHA A LGM3
F1X-U4114-60DF MARK, YAMAHA A LGM31 on diagram
x1
16.12
10
F1X-U4114-50
DF MARK, "YAMAHA" FOR DPBMT
F1X-U4114-50DF MARK, "YAMAHA" FOR DPBMT1 on diagram
x1
16.12
10
F1W-U4114-00
#N MARK, YAMAHA A RED
F1W-U4114-00#N MARK, YAMAHA A RED1 on diagram
x1
13.55
11
F1K-U411H-00
#X EMBLEM TUNING FORK SLV/BLK
F1K-U411H-00#X EMBLEM TUNING FORK SLV/BLK1 on diagram